

![]()

Diary listings have the most recent entries at the top. You can start
reading the first entry here. Originally posted in my LiveJournal
blog.
This entry last modified:
Friday, March 26, 2010
 If
you are looking to make your own Henrician French hood and/or the
complete Tudor outfit, I highly recommend using Margo
Anderson's Tudor Lady's Wardrobe pattern, with historical notes
researched by me. If
you are looking to make your own Henrician French hood and/or the
complete Tudor outfit, I highly recommend using Margo
Anderson's Tudor Lady's Wardrobe pattern, with historical notes
researched by me. |
| Something I realized I needed to do was to clarify some of the terms in the French hood. I will add more to this list as I go on.
|
||||||||||||||||||||||||||||||||||||||||||||||||||||||||||||
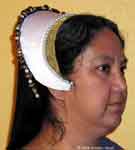
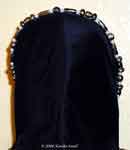
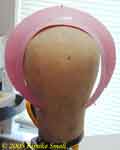
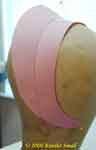
French hood mug shots
|
||||||||||||||||||||||||||||||||||||||||||||||||||||||||||||
| French Hood Mugshots | ||
|---|---|---|
 |
 |
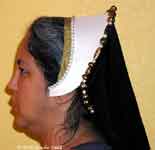 |
| Front view | Angled side view | Side view |
 |
 |
|
| Close back view | Long back view | |
Forgive the messy hair. I had tucked things in the bathroom, then went into the living room and then remembered that maybe I should remove the glasses, which of course upset everything. And forgive the lack of a smile. I am tired, and I was chatting while Rob took the photos. But here they are. I can now put this project into the done pile!
{Previous}
French hood, the final steps.
October 10, 2006
I have some time, and my right knee is popping when bent or bending, which hurts, so I am sitting here typing instead of cleaning this room. So, I figured I would get the last bit of write up for the French hood so I can get the info out there on how it turned out. I will take photos tonight and upload it all on my web site.
Last I was reading in my memories for the f-hood, I had finished the base of the hood, thinking I would add a crescent, which then led to the whole research section for the f-hood, which led to the realization I don't need to add a crescent, then I quit doing much sewing since the base was finished except for the crimped gold and jeweled billiments.
So, catching up from there...
I took a length of gold organza, doubled and basted along one side.
I then used the hair crimper I bought to crimp the gold organza
into little fine pleats, using a medium-low temp, and sewed the
organza along the inside curve of the hood. I then hand sewed the
linen lining onto the inside of the hood, covering one edge of the
organza. I then placed it on my head to see what it looked like,
and it was not pretty.
The organza stood away from the head, which is not what the images looked like, so I took a closer look at the images and on a few I could see a line of stitching along the crimped gold, so I hand basted a line of thread using silk thread near the edge (although the images were more in the middle of the gold), and then put the hood back on and gently pulled up the thread so the gold organza pulled in closer to the head and bingo! that's exactly what I needed to make the organza lie properly and look good. I later tacked the thread ends down to hold the goffered gold in place. It isn't perfect in sitting around the head, but it works well enough. I then had a baby and other things in life went on...
Then, finally, over a year later I pulled the hood out from obscurity, and finished the hood. I first made up the black hood from silk taffeta, using a pattern from the Tudor Tailor book. I sewed it together by machine using a French seam, then hand sewed the bottom edge hem using silk thread. I then sewed it along the upper edge of the hood on the top side so that the entire backside is covered. While her instructions mention basting the edge to help ease it into place, I found I didn't need it. It is not gathered, pleated or in any way have more fabric than the minimum needed to cover the back. My hair in a ponytail easily fits inside the tube.
For the lower billiments I put pearls onto a brass wire then handsewed that into place using silk thread. Each pearl is caught into place along the inner edge above the gold goffering.
I had bought some time back some plastic golden beads that were big and looked similar to some of the images of gold worked beads, and using pearls to stretch the line of beads, I figured out how to use the various sizes and styles, put the beads onto the brass wire, and made up the upper billiments. I sewed those into place as well with silk thread. I allowed the lower ends to hang free.
And then it was done! And there was great rejoicing in having finished a project after a year of letting it sit.
I will get my husband to take photos of me in the hood tonight after the kids are in bed, and post them later.
Hanford Faire recap
October 10, 2006
{segment from a longer post}
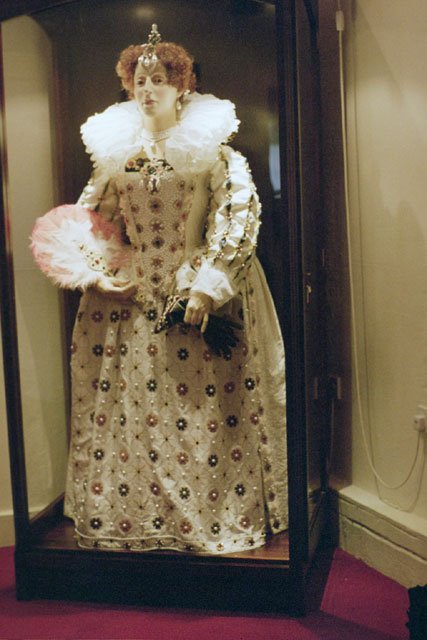
In personal costuming, my French hood was a success, for the
most part. People in court liked it and I got a few positive comments
on it. It stayed on my head well enough, although the winds could
lift it off during progress. I need to add a hair comb on the underside
to help keep it in place, or maybe a strap, but I will try the comb
first. And it is no small matter to say that only one other woman
had a French hood as nice as mine, the lady portraying Mary Tudor
Brandon, Duchess of Suffolk/former Queen of France. Personally,
I had expected many more French hoods, especially amongst the French
court, but no, very few were worn, and most were... not well made
(buckram & wire foundations were lacking in a few). Lots
of court ladies wore flat caps, lots of them, including our own
guild members. Thankfully, my ladies have finally decided they want
to actually do a sewing circle once a month, and want to make their
own French hoods and English gables for next year's event. It would
have been nice to do so over the long hot summer, but personal lives
for those ladies kept them busy.
Poking in with an update.
October 5th, 2006
{segment from a longer post}
But in good news, I did get my French hood finished last night!
I still have to take photos. Amazingly, it fits snugly enough on
my head that I don't need chin straps.
French hood theories, again.
August 7th, 2005
I went through Queen Elizabeth's Wardrobe Unlock'd, and I have an ass-ton load of images to scan from that one book alone, not to mention a few other books that have a few images each. So, this project of mine is blooming into something that's going to take awhile. I do not plan on doing it all right away, believe me, my arm won't let me. But I am happy that I finally got off my duff and started collecting the images that are there, and actually looked, really looked at what the French hoods were visually like.
I have come to the theory that there are at least two ways to make French hoods. Thankfully, someone else has already developed an online record of one theory, which I share here. A Perfectly Plausable French Hood. She also shares photos of her wearing her simple style of French hood: http://pics.livejournal.com/sarahbellem/gallery/0000q6a2?page=1
I think I shall work on the second method, which is with the stiffened buckram foundations and a raised back. However, I am not positive at all that the stiffened "crescent" is really crescent shaped at all. So my mind will have to figure what shape it really is. I've read in one book, Handbook of English Costume in the 16th Century, that it was a horseshoe shape, but I am not sure if that meant the upper crest or the main foundation, which is already a horseshoe shape. So, things to ponder on while I let my arm and back heal.
Now, off to bed if I can let my mind shut down from all these ponderings. And maybe tomorrow I will work on some sewing projects instead, like this wrap thing that's also been on my mind...
French Hood images revised.
August 6th, 2005
I've injured my shoulder & back doing many scans and enlargements so I had to take a couple of days away from the computer. But I've been a busy bee updating the French hood image page for all the images people have sent me links of. I thank them all (and they are noted on the pages). They now range in time from pre 1500s to the 1570s (so far).
With the many images coming in, and more still to scan, I've moved
everything to its own research section. Old pages will refresh to
the new pages. But here is the new url. Renaissance Research:
French Hood Images
http://www.kimiko1.com/research-16th/Fre
Please, keep those images coming. I have learned so much from seeing these various images, it's really opened my eyes. I hope this helps others with their research as well.
And if you commented on French hoods, I will be replying soon.
French hood debate
August 2, 2005
So, now that I have that load of photos uploaded, I am pondering scanning all the images of French hoods I can find, and putting them into chronological order on that page. But my body need a rest from it all first.
And after all that scanning and looking, I have concluded that there are at least two different ways to make a French hood in the 1540s, all depending on if you want a crescent shaped coronet in the back, or not.
I also decided to forego making a French hood based on the shape of Princess Elizabeth's portrait, since it is unclear how exactly that one is created. Instead it will be based on the shape of the French hood in the image of Elizabeth Seymour-Cromwell, since that one is much clearer to define. But I do like Elizabeth's jewelry, even if it's a bit over the top for me.
I have been discussing the parts of the French hood with a gentleman from England. His name is Teddy, and he's fond of bright colors in costumes, apparantly. He's actually viewed the various portraits in the museums there (ah, someday), and is involved in their re-enactment world. I think he even mentioned Kentwell, but I am not positive. Anyway, we got into a bit of a dissagreement on what the goffering was attached to. He kept saying it was a part of the coif, and I kept saying it was a part of the French hood. I finally realized that the lower base piece that I visualize as being a part of the whole French hood, is what he was calling the coif, and not some hidden coif underneath the visible parts.
This got me thinking... what if the base is a full coif? Teddy describes ... well, let me quote him in full.
My understanding of it (and the most successful ones I've seen, handles, helped people don) is that the white part is the coif with the pleated whatever along the face-opening edge. The coloured part (often red or black, occasionally a different colour - sometimes to match the gown, sometimes referred to as the "paste") is the french hood part and is made of a strip of fabric (sometimes stifened but can easily be done withotu stiffenting) that fastens around the head over the coif (on a profile picture from a coin or medallion you can see what appear to be ties at the abck of the neck holding the ends together, but it's been some years so forget the details of it) and at the back edge of that the black drape part of the hood hangs down..... Which seems to work best if sewn or pinned into a tube
Teddy
So, that changes the whole perspective on the French hood. But I am not entirely convinced there isn't a crescent shape coronet on some of the images I scanned. I even note that there are a few sketches where there is a clearly marked line from the base/coif and the coronet/paste area. So, who is correct? I think we both are. I am also inclined at this point to try both approaches to the issue, and see which one(s) look closest to the images. It's kinda nice not being pressed for time, just so I can experiment with the details.
Edit: I forgot to mention that Teddy suggests that the padding that holds the heavy upper billiments, is long hair braided and wrapped around the head. "found that scraping it up into two bunches, one either side at the top/back of the head and paliting thoese then crossing them over the top of the head towards each other was enough to give the elevated raise (that is so often misinterpreted as a stiff raised-crecent by costumers) to the hood and give something to pin into."
1540s French Hood Images now available
August 2, 2005
I guess I like to research costumes, even what some would consider minor parts like the hats and other accessories. To me, they are just as important in getting right (or close to it as we can sometimes) as getting the gown right.
I've seen a number of French hoods worn over the years, and part of why I am so keen in researching this accessory is that most that I have seen at various renaissance faires (although, not all, thankfully) usually have that upper crescent shaped way too large, and standing up way too high. For those who watched Babylon 5, a badly made French hood can sometimes remind me of the Centauri's fashion for a standing crest of hair. And yes, I have worn such a standing crest myself, so I am not pointing fingers at anyone. As we learn better, we do better.
As a standing crest is something I want to avoid in making my next French hood, I decided that the best way to determine what a proper one should look like, is to look at as many examples in surviving portraits and sketches that I could find. Unfortunately, there are no surviving French hoods that I have heard of, so portraits and sketches have to suffice. However, the biggest problem in determining what they really look like, is that there are no back images of any that I could find, or really good side views either.
But what images I have found in my many books, I have scanned and made available for everyone to view for research purposes only. I am sure there are more images available in other books and even online, but I didn't find them... yet. I know there is one book that I would love to get from our local college, Strong's Tudor & Jacobean Portraits, but they are expanding the library, and all those kind of research books are being moved into storage for awhile. When I get that book, or any other images of interest, I will update the page.
The images I have scanned are only French hoods, and they date from the late 1530s to the 1550s, but all are of similar fashion style. For now, you can find all 10 images I have, in full and in close-up detail, at my dress diary section:
If you know of any images that should be on this page, please let me know.
Various things, from goffering to crimping
to jewels to pain...
July 27th, 2005
Well, now I know how ribbon was goffered in the Victorian age.
I found this on eBay, and I wish I could afford it (after shipping
charges to the US from the UK, no way).
Victorian
Goffering Iron/Machine Twin Rollers Brass
Maybe there will be something come up stateside sometime soon that
won't cost a fortune, and works still. If only something like this
was still made today.
It has been suggested I try a crimping iron for the hair. I am not sure if that will be a fine enough of a crimp for my desires. But since we don't make goffering machines like the above anymore (that I know of), I guess I can't be too choosy. So, lets see then what I can google...
Aha! I have found the product. Conair Mini Waves™ Crimping
Iron
And there is this product: Hot Tools Micro
Crimper with 10 Heat Settings - Model 1197
So cool, that while we don't make such tools for modern fabrics,
at least we make them for hair products.
I will be calling around the stores locally tomorrow to see if I can find one. I think I like the second one better because of the variable heat settings. Who knows how much heat silk organza will take. Then again... eBay... Yep! Someone is selling the second one, so I have that on watch if nothing local is available.
Bored now.
July 27th, 2005
Bored now. I've actually managed to pin the linen lining in place on the base piece, and started pinning and sewing the coronet piece, but I'm bored. I also realized after pinning the base piece that I should put the gold goffer in place first, but I am stumped on how to pleat that piece to look right. So I've asked for suggestions from people on a couple of mail lists I am on. I guess I can ask that of a few LJ communities as well. So, it's back to hand sewing the coronet, and my hands just aren't up to the pain of it.
I really want to work on a gown... but that really does have to wait till this winter. I could work on the drapes around here... That's a thought. Maybe after Cam goes to bed I can get c0demonkey to put up the boards for the main drapes in the living room. Not all that hard to do, but it would mean being able to sew on the machine doing something a bit more creative, until I can figure out the goffering thing (goffering = pleating).
So... now what...
DD: French Hood - sewing the fashion fabric
pt II
July 25, 2005
More thoughts while I am waiting for dinner.
I finally got the base covered in the fashion fabric, and it looks pretty good on the topside. Thankfully, the underside will be hidden from view, because the sewing and fluffy parts coming off are just plain UGLY! So, here's some more notes on what to do or not do when working on a F-hood.
- Keep the hands clean when working on white silk. The hood is getting messier than I want to deal with. I may add Scotchgard later to keep it cleaner longer.
- It is ok to flatten out parts of the hood while sewing it. I just have to rebend the section when I move on.
- Remember to get another leather thimble. The metal one sucks!
- I am using white silk thread in a single strand, and it likes to fall off the needle a LOT. I finally made a square knot in the thread and it stays on ok. I just have to let it spin off the twist buildup every once in awhile.
- I am pinning a few inches at a time. I found if I pinned more, then more of the silk would unravel before I got there, and the pins are more in the way than the clips are.
- Next time, try cotton flannel instead of dommette or muslin on the wrong side. It will pad a bit more than muslin, and still have something to sew into for the fashion fabric.
- I may want to glue the f-fabric in place along the lower points where it lies near the cheeks. Because of the curve and the lack of pull in the f-fabric, some parts there kinda bubbled, which doesn't look good. It may end up getting covered with the jewels later, so we shall see.
- Silk thread is wonderful! Used a little Thread Heaven on the strand, and sewing was a breeze compared to cotton or poly blend threads.
- It is worth working at a table instead of sewing the hood in the lap. My back isn't as bad after today's work, as it was last night. Having good overhead light is also a must.
Well, tonight after Cam sleeps I may work on the coronet next, or finish off the base with the lining material, not sure which. But the smell of dinner is calling me!
DD: French hood - sewing the fashion fabric
pt I
July 24, 2005
Just some thoughts on tonight's hand work.
OUCH!! My fingers are hurting, because I am using a straight needle to sew the fashion fabric to a curved object. Yeah, it would be faster to machine sew the seam allowance of the fashion and lining material, but I know from previous experience with my husband's Italian bonnet that there will be a seam showing at the edges, and the form will not fit into the fabric as a sandwich all that well. The book I use even mentions that, which is why the fashion fabric is sewn by hand, and then the lining applied to cover.
I decided to go with both the base and the coronet in white, and the hood in black. I am not sure why I finally decided that, but it is a period option.
Next time I will put a muslin or something else on the underside of the form, instead of dommette. That fluffy stuff just isn't the best thing to sew into, and because I glued the smooth part and not the fluffy part on the underside, fluffy pieces are coming off everywhere I sew. It's just messy. Thankfully, the stitches are holding so far, and it will get covered by the lining.
I must also remember to add 3/4" seam allowance to give myself extra room for the edge turnover. 1/2" would work for machine sewing the pieces, but not the handsewing.
But the smoothness of the top side is looking good. I am using pins now instead of the clips as that works better at this point. I do have to make sure not to stick the pins too far from the back into the front, as the silk will snag, and that isn't good.
Hopefully, I will have this hat sewn in a day or two, depending on the free time I get. It just isn't as fast as hand sewing flat seams with both sides being fabric. But it will look good... it better!
DD: 1545 French Hood - Mulling it over
(with photos)
July 23, 2005
On a quiet Saturday afternoon my leg pain today is minimal. Good thing as it was very painful last night and had me on my back for a long time once I could lie down.
So today, while both Cam and c0demonkey are napping, I am working on my French Hood as I can. It's hard standing up to iron things, but I can sew a bit sitting down as long as my back is straight and supported.
I had already cut out the buckram and sewed down the wire to the edges using my sewing machine, a cording foot, and the zig-zag stitch. I then bound the wired edges in bias tape, making the tape as smooth as I could. I used fabric glue to do the job, as sewing it down became more hassle than it was worth. I found a box of clip style paper clips in my office supply stash, so I used those instead of pins to hold the tape in place while the glue dried. Because I only had one box, I had to glue the binding in sections, allow that section to dry, remove the clips, glue another section, etc. It took a lot longer than I wanted to glue on the bias tape. So last week I went and bought several more boxes to use, and also bought contact cement to glue the mulling on the underside of the hats.
I spent a part of last Saturday's AD&D game working on the hat. I first shaped the base of the hood into place, roughly, and did similar shaping to the coronet to match the base when mounted. Did you know that when you turn the base around it kinda looks like the bone ridge of the Minbari race?? We had a good chuckle on that one when docryder tried that out.
I glued the domette (what the mulling material is called) to the buckram and wire pieces using contact cement. The contact cement definitely stinks and likes to string out everywhere. Its been years since I used it last as a kid and all I remembered from then was how gloopy it was (I think that was an old bottle). I can understand why there is contact cement thinner available, since it does appear to get thicker over time and air contact. But, it works very nicely and doesn't show up on the good side of fabric or paper.
I also spent some time recently washing my white silk taffeta and white linen. I thought linen was bad on how it wrinkles. I now understand why you don't wash taffeta. It stinks like heavy chemicals when it is wet. And just as bad, if not worse, you cannot get the smallest wrinkles out of the taffeta once it is washed even on high setting and pressing while damp. I think they make taffeta stiff and smooth chemically, so my white silk taffeta will be forever marred with little wrinkles. Thankfully, the chemical smell is gone once dry. And thankfully, this piece is only for the hoods and hats I make. I know not to do that for future dresses I plan on making from taffeta. I also learned that when it is hot here, that fabric can dry out in mere minutes. I had to work quick to press both taffeta and linen before they dried, and because of my pains, I can only press for minutes at a time.
So, today, I thought I would sew the top of the mulling down onto the buckram and wire base. However, I found no instructions on how exactly to do that without destroying my fingers jabbing the needle into the base time and again. So, out came the contact cement and in just a few minutes I had the pieces glued into place.
Some things on mulling I should note for later:
- Dommette comes with one side fluffy and one side smooth. Use the smooth side up (glue fluffy side down), or rough fingers and tacky glue will pull the fluffy parts off.
- Glue dommette half sections at a time, no more, and definitely not in smaller sections. Smaller sections take too long, and doing it all at once is a big mess.
- Cut dommette exactly the size of the pattern, not with any allowance around the edge. Lynn McMaster's instructions had me adding an allowance and then cutting off the extra after the glue dried. However, it was difficult to trim away the inside curved areas without it really looking jagged, even with small sharp scissors. When I recut the pattern on the dommette exactly for the upper parts, I made sure to match the piece up first, bind them down with my clips in just a few areas, then glued the domette down. It looks much better, and actually was faster to deal with, since I didn't have to trim.
- Small sized paper clips (see the photos), instead of straight pins, are very handy when working with hats. They hold the binding over the wire, and the dommette down while glue dries. I bought several boxes so now I have plenty.
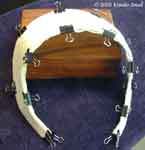
And while I waited for the glue to dry, I took photos using my new memory card that has 128megs memory, instead of the old 32 meg card. Now I can save to actual .tiff files, and not lose anything to the lossy nature of .jpgs (something I need for my print portfolio). So here's what the mulled pieces look like while waiting for the glue to dry.
| French Hood Mulling | ||
 |
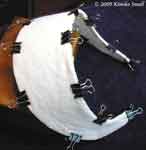 |
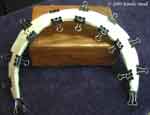 |
| Front view of the mulled base. | Side view of mulled base. | Front view of the coronet. |
I am definitely happy with everything so far, except the wrinkled taffeta, but I will live with that. Next will be cutting out and sewing down the fashion fabrics, finally!! And that I do plan on sewing by hand. At least I have the mull to sew the top fabric to, and the lining can be sewn to the top fabric. It's attaching the two sections together that I do not look forward to.
DD: 1545 French Hood musings
July 21, 2005
So my thoughts in bed turned to my French Hood. On h-costume mail list, we've been discussing Pewter Replicas, and how the pewter ouches would be heavy when attached to a garment (instead of worn as a jewelry item directly on the body).
One lady highly recommended Annie the Pedlar for her ouches as they are made in brass (or gilded brass) not pewter, so they won't weigh so heavy on the garments. She's actually used both venders for her costumes in the UK, and while she likes both, prefers Annie over Steve (the owner of Pewter Replicas).
Mind you, this lady's recommendation is high, as she's done some incredible costumes of her own for various museums there. Her name's Suzi Clarke, and you should see her website sometime (I've only skimmed it a bit so far, but she's good). If you see her Gallery, she doesn't keep her photos in any particular order. But for 16th c. costumes she's done, I will post a few links. Here is her Henry VIII & Anne Bolyn, a close-up view of Elizabeth I that is in the Isle of Wight Pearl Museum. And another view of Elizabeth I. It's those two that she has used Annie's ouches for the costume, as Annie shows on her own site.
Which got me to thinking about how heavy the real ouches had to be if they were made in gold (or even plated in gold), considering their size. My mind said that such heavy jewels just wouldn't be easily supported by simple wire and buckram frames of the French hoods... which made me wonder if there is something underneath the back of the hoods that actually support the weight of the jewels. Considering the front jewels are smaller and rest directly on the head, while the back jewels are bigger and appear to be above the level of the head, there just may be something under that part of the "coronet" that is hidden by the black hood. I think that something may be as simple as a roll of padding.
It could explain why all the back jewelry is directly behind the black hood line, as contrasted by the white coronet frame itself (see the clear example here). Most modern reproductions of the FH usually use much smaller pieces of jewelry and are noted as being attached to the wire frame of the FH. But if there is a small roll of padding back there, then something heavy could be worn, and stand away from the head, as seen by the various portraits I have seen and noted earlier. At least that's my theory right now.
I think I want to see if I can put in a roll under there, to see if it would help support heavy jewels. Thing is, do I want to buy the heavy ouches as part of that experiment now (when I really don't have the money yet), or maybe... maybe Bob at Dragon's Treasure can help me with some of his things that can work as weights or something, just to check this theory out. Or, I could just buy fishing weights or cheap jewelry or something and see... Ok, I gotta finish that FH soon. I've been stuck at the mulling stage while my back is recovering, but I should be able to hand sew it while on the couch or something at night (when Cam's off to bed).
Now it is my time to try and get some sleep... again. I think now that I've written this down I can finally get some peace of mind to sleep.
4th of July, and French Hood continued
July 4, 2005
Well, 4th of July was fun. I spent today sleeping in (that was nice), then we went and bought a couple of ceiling fans for the house, one for the playroom, and one for our master bedroom. I can't wait till they go up and help cool the rooms more. As for tonight's fireworks, Cam liked the pretty lights, but like me, he doesn't like the loud noises. I personally can't stand whistling petes, the really loud high pitch screaming displays. I have a very sensitive upper register so it annoys me to the bones. But I did take some film photos of our first fireworks fun, just for the hey of it. I hope they turn out good. Otherwise, Cam got bored easily, and was very fidgety. Not surprising since he isn't even 3 yet.
I spent a part of the day while Cam napped working on the French hood. I even took a couple of photos of the pattern sitting on the head dummy, that you can see here.
| French Hood Mockup | |
 |
 |
| Front view of the pattern, showing base and coronet pieces. | Side view of the pattern. |
Not much to look at, but I wanted to show something, as it will be awhile in the process.
I am using theatrical buckram, the two-layer kind, which I am hoping will be enough to manage the abuse and weight. If not, then I will be making another one and consider it a lessoned learned. I managed to get the buckram traced and cut out, then wired along the edge with 18 guage milliners wire (the wrapped kind). I have this handy beading foot that fits the wire perfectly, so I can zig-zag stitch instead of hand stitching the wire into place. I then bent the two pieces into semi-shape, and have started covering the wires with single-fold bias tape that was pressed open. My machine wasn't doing too well with the bias tape, and the buckram is rather heavy, so I decided to use a flexible fabric glue, and glue the bias tape over the wires, and hold them into place using small binder clips while it dries (which takes 5-10 minutes).
I went rather slowly on the taping, as by then Cam was awake, we had the guys over, and working on dinner and fireworks fun (c0demonkey makes some great BBQ tri-tip and sweet corn on the cob). So, the two pieces are still not finished with the taping, which I hope to finish off tomorrow. Maybe even getting to mull the pieces with real domette as well (I got the domette in LA last year at California Millinery Supply).
Anyways, sounds like the neighbors next door have quit their very late fireworks fun (it's not like they didn't set off many earlier tonight), so I am going to head off to bed and hopefully some good sleep.
1540s French Hood; Research Begins
July 3, 2005
I spent some time today pondering a number of garment projects, and I got stuck on one of them. I find that when I get stuck on something, it's better for me to actually spend my sleeping moments thinking and dreaming about the issue, and tackle it afresh the next day or two.
So I decided to work out the pattern for my French hood instead.
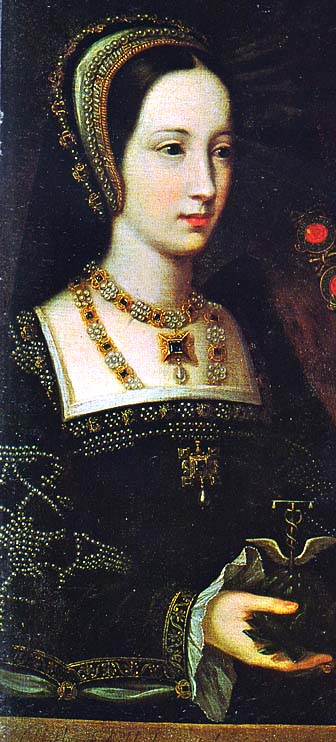
I want a French hood for the mid 1540s, namely for Kearney Faire when I portray Eleanor Brandon (second daughter to Mary Tudor Brandon). I originally wanted to borrow from dear "Mama's" portrait, but this is from 1515, 30 years out of style. I still want the jewels, but the shape of the hood has to be updated.
I have Lynn's pattern for the Elizabethan era French hood. It's lovely, but that's not a style that matches the time frame. So, it came down to actually looking at the appropriate images of that time... wow, what a concept (said very sarcastically) and see what the style was in the 1540s. Also, I had been looking at sites on how to make the hats, and there are different ways of doing so. Instead of following another person's lead, which may or may not be accurate, I decided to figure out my own way of doing so based on the images I have. I do have a few books that show the images I chose much better than what is seen online, but you should get an idea of what I was looking at. These are the images I have found of women wearing French Hoods (all from the same site):
- Princess Elizabeth c. 1545 (or 1546)
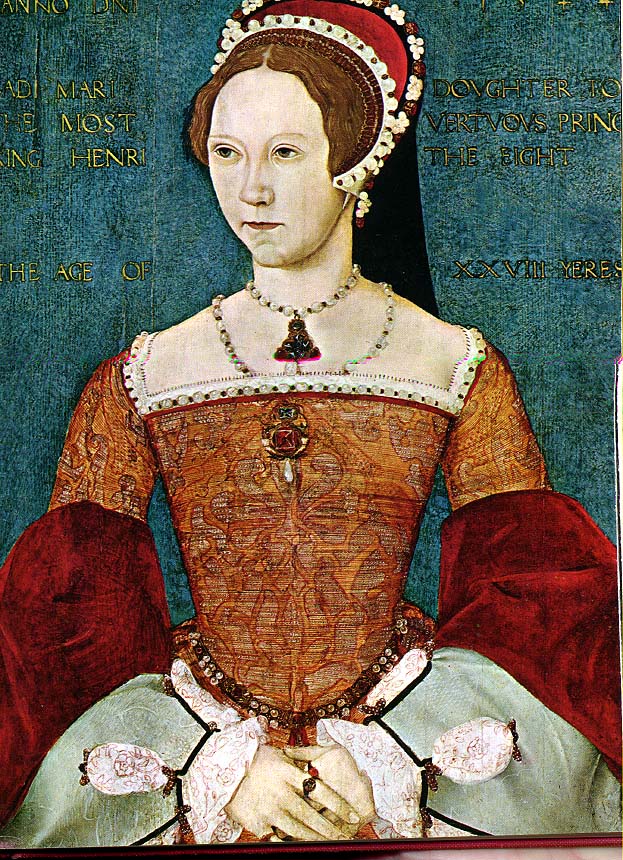
- Princess Mary c. 1544
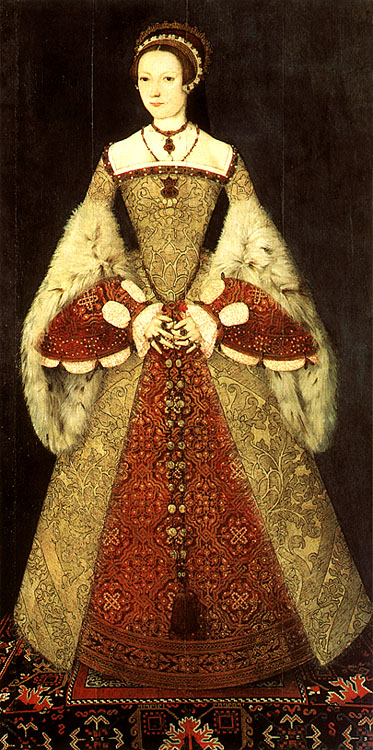
- Catherine Parr c.15?? (considering at Kearney, that's Henry's wife during that faire, this will do time wise.)
- Unknown Lady (sometimes called Catherine Howard) c. 1541
[EDIT: Offered by femalegamer: another woman wearing a French hood: Image of Unknown Lady, sometimes known as Catherine Howard, but may be of the Cromwell family, by Holbein, c 1536-1546.]
I am finding similarities between all four, although the one of Cathering Parr is too difficult to make out considering she is looking at you straight on. Since my printed copy is currently awol, I won't rely on that image much.
- All have a base band in white, and a crescent coronet in another color (usually matching the color of the dress (2 red, 1 gold, 1 black). Is the white band a band, or part of an under-cap the crescent is attached/pinned to?
- All have a pleated gold band filling the inside area
- All have lower and upper billiments (the jewelry)
- All have the upper billiment hanging down from the hat, which have gems mounted in gold
- All have pearls, especially for the lower billiment. Two have small beads (gold?) between each pearl.
- All have a black hood (which appears in two of the four to start in front of the upper billiment, so that the billiment sits on the black hood, leaving a black line outlining the crescent)
One site [edit: Drea Leed's article] has info and a pattern for making Elizabeth's hood (pattern image here), so I thought I would start there. However, on further looking at the other images, I realized that Elizabeth's hood may not be one piece, but two pieces, both of red fabric and covered with the jewels and pearls, so you can't really see it as something other than one piece. So I experimented with construction paper, and found that if I just made the band from the original pattern, it kinda raises from the head in back, but not by much. But if I add in a crescent (borrowed from Lynn's pattern), then the crescent raises from the head more like the portrait. This works with the instructions from Lynn's pattern, and from Ninya Mikhaila's pattern, a lady who does the costumes for Hampton Court Palace (her pattern is based on Princess Mary's portrait.)
It also appears to me that the "goffered" or pleated gold band in this portrait rests partly on the white head band seen in the other images. I will have to blow up the image a bit to see (I will be scanning large head shots soon), but there appears to be a colored area under the transparant gold, and a white band as well behind the colored area. It is my theory that this may be the white band of the hood seen in the other portraits much more clearly. As to the white band being a cap, I think my plan right now is to make it a band, and try the whole undercap idea another time if it doesn't fit on the head well.
So, with all that research, I've decided to use this combo pattern for my French hood, and in general use Princess Elizabeth as the inspiration for my hood. I will simplify the pearl use a bit, and use other mounted gems. I found a possible bead from Firemountaingems.com. I would love to use the ouches I found earlier, but at $5.00 each, that's a bit out of my price range, when I have to buy 18-20 of them. The hood style seems to work with my head and the coronet doesn't stand up too high (something that I see way too often at local faires. I call it the "reversed visor" look, because it seems they are using a plastic visor for their hat base as a quick alternative to buckram and wire), so this one is a go.
The plan is to make the band in white silk taffeta, and the coronet in black silk taffeta. This way, it will be sure to match any color dress I end up making, although I am leaning to a burgundy red dress. I just can't wait for the silk to arrive to start on the hood, although I do have the buckram, wires, and domette, so I can start this tomorrow if I get time.
{Next}
| 1545 French Hood Basic Information | ||
|---|---|---|
| Start and Finish Dates: | Start: End: |
July 3, 2005 October 4, 2006 |
| "Given To or For": | Personal use, for Tudor era gown | |
| Pattern/ Book/ Magazine/ Internet Site Used: | Pattern: | Original design by Kimiko Small
© 2005. Based in part on info from the following sources, and from my own theories as noted in the dress diary. |
| Pattern: | McMasters, Lynn (2001). Elizabethan French Hood, Out of a Portrait. Did not use actual pattern for final French hood, but the pattern did provide info on research. | |
| Books: | Dreher, Denise (1981). From the Neck Up - An Illustrated Guide to Hatmaking. Madhatter Press. ISBN 0941082008 | |
| Mikhaila, Ninya and Jane Malcolm-Davies, The Tudor Tailor: Techniques And Patterns for Making Historically Accurate Period Clothing. Costume & Fashion Press. ISBN: 0896762556 | ||
| Internet: | Mikhaila, Ninya. Making a French Hood [Article] © unknown, Nottingham UK: Author. Retrieved July 3, 2005 from the World Wide Web: http://www.ninyamikhaila.com/frenchhood.html | |
| Leed, Drea. Constructing a French Hood [Article] © 1997-2000, Dayton OH: Author. Retrieved July 3, 2005 from the World Wide Web: http://costume.dm.net/headwear/fhoodmake.html | ||
| Type of Sewing Project: | Costume - hat/hood | |
| Size: | Fits most heads | |
| Fabric Used: | Foundation: | Theatrical double buckram with 18 guage milliners wire |
| Mulling: | Dommette from California Millinery Supply, Los Angeles | |
| Lining: | Lightweight 100% linen in white from B.R. Exports | |
| Fashion: | Snow White 100% silk taffeta from
B.R. Exports Jet Black 100% silk taffeta from B.R. Exports |
|
| Fabric Designs: | No designs on fabric | |
| Fabric Colors: | White and black | |
| Ornamentation: | Upper Billiments: | Plastic gold beads of various styles with plastic pearls. |
| Lower Billiments: | Pearls, plastic. | |
| Project Costs: | To be determined | |
Home
Creative Blog
Kimiko Small Designs
Joan Silvertoppe's SCA Resumé
Warderobe Accounts
Brodyworke Accounts
Scriptor Arts Folium
Tudor Research
Workshops & Articles
Inspiration Gallery
Largesse
Favorite Links
About Me
Contact Me
http://www.kimiko1.com
Entire website, graphics, and text (unless otherwise stated)
© 2003-2013 Kimiko Small, All Rights Reserved