

![]()
Diary listings have the most recent entries at the top. You can start reading the first entry here. Originally posted in my LiveJournal blog.
Completed Tudor Shift photos.
|
|||||||||||||||
| Embroidered Tudor Shift | ||
 |
 |
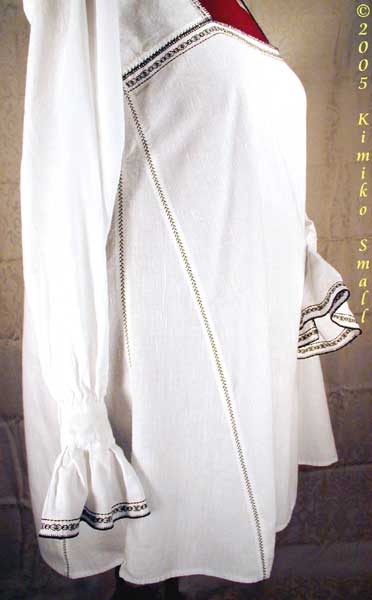 |
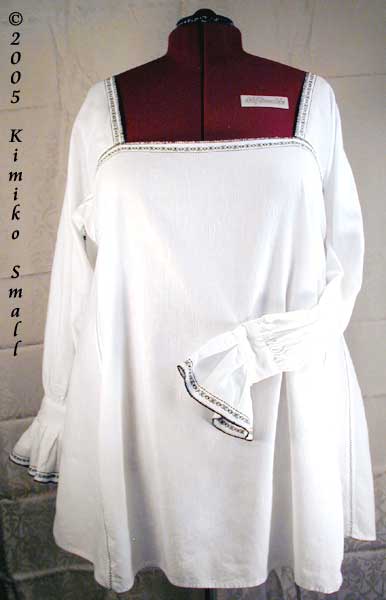
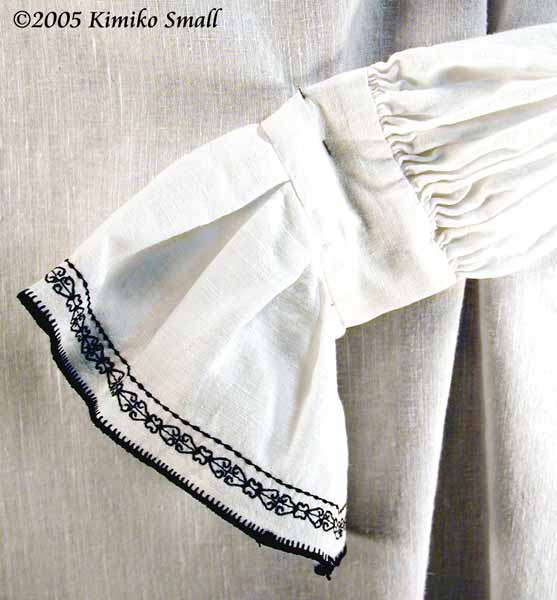
| Front view of shift. Sleeve is pinned into position. | Detail of left hand cuff showing gathers and embroidery patterns. | Side profile of shift. The angle of the side gores are apparant. |
 |
 |
 |
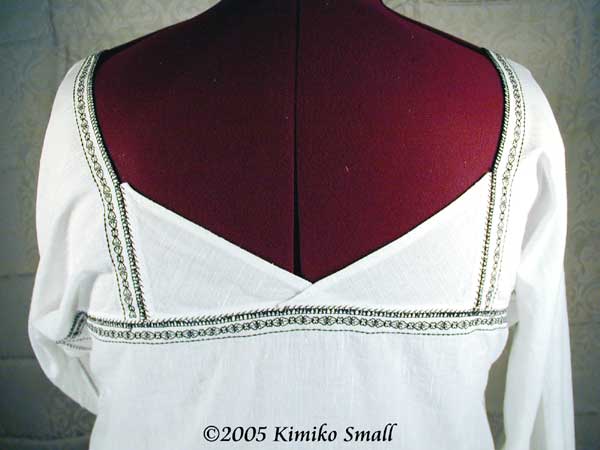
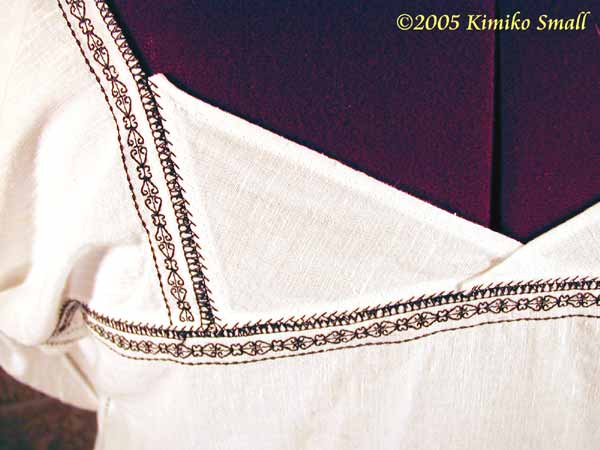
| Back view of shift showing the back neck triangular gussets that limit the sleeves from falling off the shoulder. | Close up detail of back neck gore, left side. You can see the overlap of the gores. | Layout of this pattern for personal use only. pdf version of shift layout (73k). |
I want to again thank Rondinella Olsen for teaching her class on Tudor Costumes, and on teaching us this style of a Tudor Shift. This came from her ideas, not mine. I just wrote up the layout for the pattern. She also gave us some tips for costuming in general that I used in making the shift, such as finishing each raw edge before sewing the pieces together.
For me, I would make a few changes to the original pattern Rondinella gave. First I would measure a little above the nipple, so it would wear higher in front. I would also make the gores end higher up the back to pull the sleeves in tighter. IIRC, the sleeves do fall off a bit more than I want to deal with on a regular basis, but the bodice holds it all in place. I did that on the layout pattern.
Something I do like is that all the edges are finished before the shift is put together. With linen, this is wonderful, as I don't ever have to worry about raw-edged seams coming undone in the wash, or a serged edge unraveling.
Someday I hope to have full photos of this chemise with a Tudor court dress. But that will have to wait till after the baby comes and I am able to wear a corset again, and then make the new Tudor gown, so not anytime this year.
{Previous|Finis!}
Tudor Shift update.
October 29, 2004
I finally finished my Tudor shift, at least the material parts. I still have to sew on the hook and eyes on the cuffs, but it is done othewise. It fits well, and the shoulders do fall off a little, but not as badly as square necked shifts often do. I hope to have photos of the shift soon, like maybe this weekend. It definitely is pretty. I like the blackwork, especially on the ruffled cuffs that just flutter over the hands.
Next item for costume work will be the jewels for the bodice, carcenet, and maybe the gable hood. I am debating doing a french hood instead, as gables were not as popular in 1542 as they were earlier. We'll see what I have time for.
Now, off to bed.
Embroidered Tudor Shift, Part II
October 26, 2004
Well, I spent a few more hours off and on working on the shift, and I managed to sew almost all the pieces together; all but the cuff area and the back gussets. I have come to realize that this will probably work up faster in general if I serged the pieces together, and wondered if the serged parts would look nicely decorative if I used black thread. But I don't have a serger, so that is just speculation at this point. Besides, this is a project to test out the pattern in general, and the method of finished seams joined with a decorative stitch, so serging it would have been pointless.
I am getting tired I can tell, so if there are typos, or things don't read well... oh well.
The shift does fit, with a bit of room to spare. I think that this is unintended by my moving the gusset arrangement around a bit, which widened the bust area. The sleeves at the shoulders are currently falling off, but that is supposed to be alleviated once the back gussets are sewn into place. However, the pieces I cut out are too small, by about a quarter inch each (BAH!!) even with stretch. So I will make larger gussets tomorrow and sew them on, probably to overlap a bit.
I will also be decorating and sewing in the cuffs as well with the little frill at the wrists. I thought of making them separate, like the wrist ruffs would be separate, and I thought I would just put the frills on anyways... except now I am rethinking that idea... again. Whatever I decide tomorrow will be it. I hope.
But at least I did remember to take a few photos of what I am doing
before I sewed the whole thing together. Now, it would look better
in photos on the dress dummy (I won't take photos of me in my undies
wearing it, it would scare too many people.)
| Embroidered Tudor Shift | |
 |
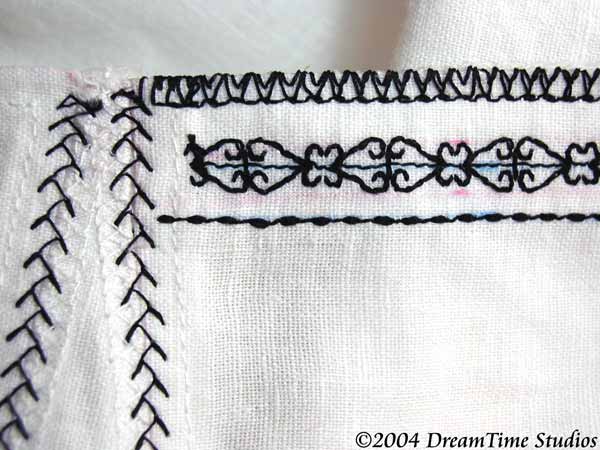 |
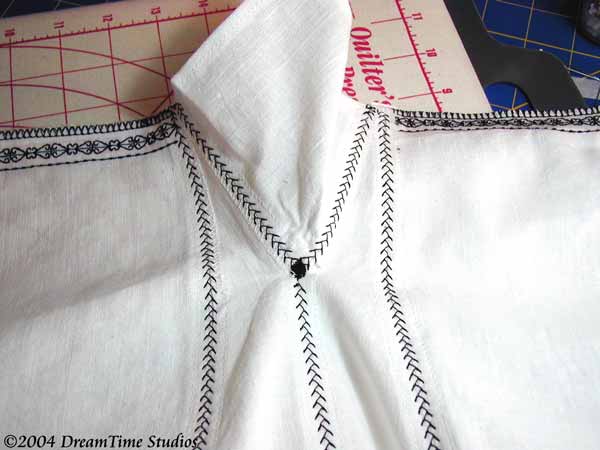
| View of side gussets with underarm gusset between. | Detail of seam and embroidery patterns. |
In the image to the left, the black dot was done to reinforce the area, as it was gapping open there, and I didn't want it to pull open later. I had to make a few more of those, as the gussets wouldn't fit "perfectly" into place when butting it against other seams. Remember all the seams are already finished.
In the image to the right, you can still see pink and blue marks where I chalked out guidelines to follow when sewing the designs. I ended up using a couple of different stabilizers for the embroidery. The main areas I used iron on stabilizers, and the edges I had to use water soluble stabilizers, or the Vs would frequently misalign and shift. Unfortunately, most of the stabilizers are still on the garment. Iron on is supposed to peel off easily, but it pulled at the stitches, so I am just going to let it wash off. It is good to be able to wash one's costumes, it really is, because you never know when you are going to get drenched in a downpour.
Anyways, my mind is shutting down now, so off to upload the images and head off to bed. I hopefully will be finishing the shift tomorrow.
Embroidered Tudor Shift, Part I
October 25, 2004
I recently have been busy working on a new linen shift. After all these years my old ones are dead or dying. One was more a partlet, but the pewter clasp on that one broke in half while in storage. I don't know how that happened. The other one was my second shift (the first was a ragland drawstring chemise that disappeared), and after more than a decade in use it is just too frayed to continue for much longer. This new one is my prototype model for the new pattern, and I made it with my medium weight linen that I already had (and used part of on my husband's shirt), instead of the nicer handkerchief linen that I will be buying soon for the improved model of chemise... once the bugs are ironed out.
New Pattern Model:
While at Costume College one of the teachers (Rondinella Olsen from Texas) showed us her method for making a Tudor shift, using the basic rectangles and triangular guessets. I took down copious notes, and recently dragged those notes out, cleared up my hash marks, and wrote up a basic pattern sheet to work from. Her pattern is not based on an extant garment (there aren't any that I've seen from the earlier Tudor time period), but from her understanding of the portraits themselves and this image. The back of the neck area especially, which is in a V shape, not a U or squared shape close to the neck. She says the trick is in the back neck gussets. I would explain more, but with out the full pattern to show people, I really can't describe it right now.
Since they are rectangles and triangles, I didn't bother actually making paper patterns to cut from, but just squared up the linen (after multiple washings and pressing) and using the quilting ruler and a rotary cutter, measured off, penciled tick marks, and starting cutting out the shapes I needed. The amount of linen needed was less than two yards, and I am a large woman. I think smaller women would only need 1.5 - 1.75 yards of 60" linen.
Putting It Together
After much thought, I decided to finish off most of the edges with a simple double turn under and sew them into place with the machine using a 1/2" seam allowance. I am sewing the pieces together, finished edges butted to finished edges using a decorative feather stitch to hold them together. I thought about hand sewing it all, but I decided against it for various reasons. I left the selvedged edges (which frames the upper chest) for a single turnover and used a decorative stitch to hold them in place. The decorative stitches are in black silk machine thread that is quite strong. I also machine sewed decorative stitches along the top of the body and sleeves area with two patterns that remind me of simple historical blackwork patterns.
After some work with the first two pieces not wanting to feed together at the same time, I realized that the best way to sew them together was to use iron on stabilizer to butt the edges together first. This entails cutting out 1/2" strips of stabilizer, pinning the edges together with the stabilizer on top (wrong side of fabric up), then pressing down on it all for 10-15 seconds. I am happy to have glass headed silk pins to work with, as they can take the full heat. I have sewn together about half of the pieces today, and hope to finish the other pieces tomorrow.
I did put in a decorative stitch where the underarm gusset (UG) meets the side gussets (SG). To explain, I put the underarm gusset between the two side gussets on the straight grain. I have seen other people put the UG above the SGs, and even the teacher told us to do it this way, but I decided against that when I saw this image of a woman's smock at the V&A. (the full page is here: A Women's Smock c. 1630.) You can see there how the UG is attached. In fact, this smock in general with each seam done in a decorative stitch is what inspired me to do embroidery with black silk thread on my seams. I just happen to use a machine instead of doing it by hand. And when and if I get my embroidery machine going, I may create a chemise with the full embroidery images on it. I know, this is a later chemise, but even earlier versions of smocks, shifts, chemises and partlets all have some form of decoration on them, including fine lace.
Things Learned:
I have learned a few things along the way. I made the side gussets too short when I was butchering the small upper corners trying to get them sewn down. I had to mock serge that area instead of rolling the edges, although the rest of the seam is rolled. So next time I will know to just cut that corner down to the seamline and not any further before serging the section. I do wonder how they dealt with such corners when hand sewing them, as they are so narrow and it was so hard to deal with trying to roll the edges down. But then people back then were very adept at hand sewing in tiny little stitches on tiny rolled seams that I just haven't mastered... yet.
I also think my UG is too small, but I won't know for sure until I wear it. I made the size of the UG according to the teacher's notes. I had to guess at the SG bottom width, but a similar pattern showed it to be the same width. However, with my hips... well, we shall see. The teacher gave the idea of the garment, and some construction details. Other measurements were not mentioned in much detail.
Hopefully I will have pics of the shift soon. I have some pics already, but it's getting late and I don't have any of today's work in photos. Maybe tomorrow I will take pics before I get sewing again. Now, it's off to bed. I'm up too late as it is.
{Next}
Home
Creative Blog
Kimiko Small Designs
Joan Silvertoppe's SCA Resumé
Warderobe Accounts
Brodyworke Accounts
Scriptor Arts Folium
Tudor Research
Workshops & Articles
Inspiration Gallery
Largesse
Favorite Links
About Me
Contact Me
http://www.kimiko1.com
Entire website, graphics, and text (unless otherwise stated)
© 2003-2013 Kimiko Small, All Rights Reserved